Wednesday, September 30, 2015

MyMaps: Student Created Maps!

Earlier in the school year I introduced the idea of using Google MyMaps in the classroom.  Over the last week couple of weeks, I began using it in a couple of my classes.  The result of the students using MyMaps was stunning.  While these maps are imperfect (missing details periodically due to student error), they demonstrate so many possibilities for student creation.

European History - European Explorers (Freshmen through Seniors)

European History - Absolutism Research (Seniors)

World Geography - Distribution of Natural Resources (Sophomores)


World Geography - North American Research (Sophomores)

Lesson Plan Design


First, determine what your goal/objective is for the lesson.


For both World Geography and European History, it was an easy and natural fit to use MyMaps.  In European History, I have always had students do some type of presentation (Powerpoint, Keynote, Slides) to detail the trips and explorations of various explorers.  But as I prepared for that annual lesson, I decided to give MyMaps a go around in order to have a completely student created product.
For World Geography, I have always wanted them to get a greater understand of the world's natural resources and the disparity of their use/production throughout the world.

Tip: Create a generic map for students to look at, in order to understand how they can manipulate their own maps.

Second, provide the guiding questions and objectives for students to quickly access and research. 


New this year, I have been using Google Classroom for my classes.  To get students the questions and topics, I posted an "assignment" on Google Classroom with the following:
Topics/Questions
Types of resources to use
How to cite sources
Link to MyMap (Created by me, but will explain how later)
Initial Due Date (To help critique student work)

Tip:  When creating the MyMap link as a teacher, go to mymaps.google.com.  Then click share and change access to "Anyone at *School Domain* with the link" and "Can Edit."  Next, copy the URL and post it on the Classroom Assignment.
Front Page of
mymaps.google.com 


Third, students begin researching and posting their information to the linked MyMap.


I had each student (or in my case pairs) create a "layer" on their MyMap for a couple different reasons.  First, I wanted to be able to easily assess the students without having to search throughout the map for each students work.  Second, it prevented students from accidentally deleting or changing other students work.

Tip:  There is a limit to the number of layers (10 Total) you can create, so be cognizant of the amount.


Fourth, review students work and provide immediate feedback on their design and information.


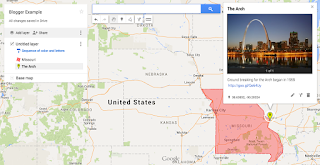
Example of Student work
As students begin posting their information to the map, give them insight on how best to improve their layer.  For example, having students use different colors/symbols in order to differentiate their work from other students (Ex. Christopher Columbus being the yellow line and markers).  Some other ways to improve their map would be to include the following:  Pictures/videos on markers, journal writings or data information for each marker, proper structure/organization on the side information bar.

Tip:  Unlike the other Google Apps tools, Google MyMaps does not automatically update as students work on it.  However, if you reload the map, all the other work will be updated to your map.


Fifth, share the student work with the rest of the world!


After students have completed the assignment, change the share settings to "On - Public Web" and "Can View."  Then copy the URL and share it out to the rest of the world!

Tip: Post it to Google+ in order to demonstrate your students work, as well as inspire other teachers to have students create their own resources!

What other ideas do you have for student created maps?  Ways to make the process even better?

A video below to explain how I use this in the classroom!


Sunday, August 30, 2015

Google Educator Presentation

This Friday I get the joy of presenting to various teachers within our Conference.  My presentation will be focused on the Google Educator Certification Process and everything needed to do well on the exam.  I have included the Presentation on this Blog, so give me any other suggestions you have concerning the exam and it's process!

Thanks to various individuals who helped me along the way: 
+Patrick Dempsey 
+Alice Keeler 
+Jay Atwood 
+Kyle Pace 


Sunday, August 16, 2015

Google My Maps - Student Created Maps

Maps

As a high school social studies teacher, I constantly use different types of maps for all of my classes.  More times than not, these are maps created by other individuals with various amounts of information that may/or may not be pertinent to my classroom.  

After attending the GAFE (Google Apps For Education) KC Summit this summer, the idea of map creation (as opposed to map consumption) became a real reality.  The presentation was done by Stafford Marquardt (Product Manager for Google My Maps) on how to use mymaps.google.com to create interactive maps.  Simply put, this presentation rocked my world in all the right ways!

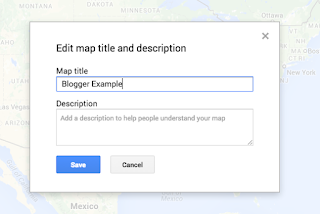
Title the Map

So how does it work?


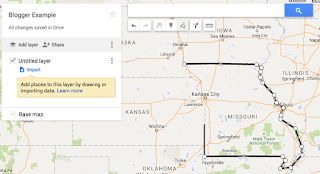
Outline an area
First go to mymaps.google.com and start creating maps!  One of the cool features of My Maps is that the file is automatically saved in your Drive so that you can access it like your other Google Docs.  Which means you can also share them just like Google Docs, Sheets, Slides, etc.  I realize that right now I need to provide more details on what to do, but really just messing with My Maps will amaze you. 


Tips/Tricks

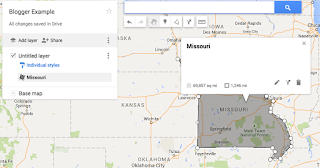
Title the shape
Create various different "layers" in order to keep it nice, neat and organized.  If you want students to work on the same project, then have a different layer for each student.  

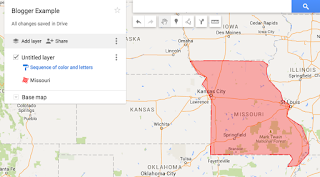
Use the drawing mechanism to outline states, cities, etc. and then apply a color over the top.  Once the color is applied, you can change the transparency to the desired level.
Provide a color to the shape

When you use the "marker" option, you can include pictures, videos, descriptions of that marker or location.

Insert a marker with various Details
If you do not want to create maps, or have students create maps, Google has provided some pre-built maps.  These maps can be found at both of the following:

MyMaps Gallery

Google Maps Gallery

I have created a short Youtube video (60 seconds) that demonstrates how to download one of the template maps as a KMZ file and then import it into My Maps:

Also provided is the Presentation done by Marquardt that explains and provides examples of other ideas using My Maps:

MyMaps Presentation

Classroom Example:  

Have students draw the path of Lewis and Clark from St. Louis to the Pacific and back.  Break up the students with the job of a specific city on the route to another city (St. Louis to Omaha).  Then have students trace the path, provide images of those location (Past and Present), and include words/images from the Lewis and Clark Journal (Link to Journal) to the spot where it was likely written.

Conclusion


I want to end with the following statement I have used constantly in the last two months. Start by messing with it and do not be afraid to break it.  It normally is easy to fix and you will be shocked how capable you are at creating cool/interactive things!


1st Day Activity

Welcome Back!


Today we began the new school year!  This year brings with it a lot of new and exciting opportunities for our students.  One of those opportunities includes the influx of chromebooks in a few classrooms.  I was blessed with these new devices after working with iPads for the last 4 years.
Thought-Provoking Idea

New Ideas


As I began to prepare for this first day, I was challenged by a tweet from +Alice Keeler.  Her tweet challenged the following idea: 'Who says we need to go over the syllabus the way we have for the last 50 years?  Who says that we need to "talk" over everything the first day?'

With this thought provoking idea, I developed a new idea.  Why not have students create something that was shared out to the world that describes the syllabus, the class, and them personally?  After talking to my principal, +Chris Thompson, and a fellow teacher (My wife), +Amanda Houp, I created an assignment on Google Drawing for the first day.  (Copy of assignment Link)

My Example

Procedure


As students came into my class, I had them grab a chromebook and log into their School Issued Google Apps Account.  Of course a few students had forgotten their passwords, but with me being the Google Apps Administrator it was easy to change their passwords.  Then I directed the students to the Google Classroom site in order to enroll in my "class" (classroom.google.com).  To do this, I displayed the enrollment code on the TV.  Some students logged on, others struggled.  To help alleviate this and get students on the same page, I had the logged in students (experts) help those struggling.  This helped everyone get on the same page much sooner.  Also, I created a basic example that I would turn in if I were a student which gave visual learners an idea of how to approach the assignment.  (Copy of Example)
Google Drawing Template (Copy)

Details of Assignment


Google+: Student Work Shared
At this point in the class period, students began to work on the Google Drawing by "making a copy."  I would use this time period to periodically teach students different tips/tricks with the Chromebook/Google Apps Account.  Overall, students gained the following skills:  Location of my website (full of resources); Use Google Apps/Drive/Drawing; Find Images/Text; definition between public domain; A few details of my class syllabus; Class Direction/Content; etc.

Tips/Tricks:

Here are a few of the shortcuts I learned and passed on to my students:
Image Attributed to Alice Keeler
Link

Ctrl+L= Highlight URL

Ctrl+C= Copy

Ctrl+V= Paste


On a chromebook, use three fingers on the trackpad to switch quickly between various open tabs within Chrome.

Final Reflection


Are there other ways to do this?  Absolutely!  But overall I was very happy with the amount of preliminary skills students developed.  If you have other ideas or tips, please share for others to learn!


Google Classroom Assignment

 Resources:


My website for all my classes:  Coach Houp's Website
Alice Keeler's Website:  Teacher Tech


Sunday, August 9, 2015

Using Google Sheets to Create Google Apps Accounts!

Purpose


Last year I took on the task of creating user accounts for the High School and Junior High students/staff.  My goal was to help our upper levels use them and for it to go smoothly.  Goal Achieved.  Sadly, I did it in a very inefficient manner last year.  I had the secretaries email me the student information from SIS (Student Information Services) with their appropriate grade level.  Then I typed every person's name (first and last in separate cells), username with domain and then applied the same password to the accounts (The only thing I did efficiently).  While it was successful at creating the accounts, it took "For.. EV... ER!!!"


Format Received
from Secretaries
This year after attending a google sheets presentation done by +Jay Atwood, I decided there had to be a more efficient way to approach it.  Thus the purpose of this post today is to help you do it more efficiently (Though I know there are still more simple ways to do it, so do not be afraid to comment with your own solutions).

Step 1


As I did last year, I got the student information from the secretaries (this time the Upper Elementary since the majority of the high school and junior high students remained, minus the seniors).  They sent it in the same format of one cell containing the last name, first name.  I then looked for a formula to split names between first and last name into separate cells.  That Formula is =SPLIT(A2:A,",") with "A" being the cell in which the names are located. The second part of the formula "," tells the formula to split the words at the comma.
Split Formula for the Names

Tip:  I tried to use the =Arrayformula to carry down the split to the rest of the data but was unsuccessful.  Ultimately I just triple tapped the small blue box which sent the formula down the sheet.

  Step 2

Formula for the Trim
of the First name with space
Now with the names split, I ran into a minor problem with the first name.  The formula split the names but left the space before the first name (because it was located after the split).  When trying to combine the names (will talk about that here in a second) it left a space, which caused problems.  The next formula I had to use then was to get rid of that space.  The formula for that is =trim(D2:D) which took away the space, leaving the first name the way I needed it.

Tip:  I tried to use the =Arrayformula to carry down the split to the rest of the data but was unsuccessful.  Ultimately I just triple tapped the small blue box which sent the formula down the sheet.

Step 3


With the first name and last name in the format I desired, I began the process of creating the username.  Our district decided to make the username as followed: First initial of the First Name combined with the full Last name.  Here is the formula to do that, =CONCATENATE(LEFT(E2,1),(C2)).  Of course the Columns reference where I have the specific data so you will need to change it to match your specific spreadsheet.

Step 4


Now I created a column with the domain of our school just so I could finish the username with the goal of creating the accounts for the school's Google Apps Domain.  The final column I created was the fully combined username for the Google Apps Domain.  I wanted to combine the first initial+last name with the appropriate domain.  The formula for that was =CONCATENATE(F2,G2) , with F and G being the location of the data

Formula for the CSV file sheet

Step 5


Then I created the sheet that would ultimately turn into the CSV used for the Google Apps Domain (based upon the example provided by Google).  Here is how the sheet should be setup: Column A = Email Address; Column B = First Name; Column C = Last Name; Column D = Password.


Formula for the Password
for the CSV File Sheet
Now the first sheet had all the information I needed so there was no need to retype it all.  The basic formula I used was =ARRAYFORMULA('Formulas To Auto-Create Usernames'!H2:H).  From what I understand, the arrayformula portion of the formula pushes the formula down the rest of the rows. Then the last part of the formula (in this case H2:H) shows where to pull the data.

For the Password, which I made standard for different organizations in the domain, I used another formula =arrayformula(IF(REGEXMATCH(A2:A,"@"), "Example24&", " ")). Basically this formula pushes down each row (arrayformula), then finds the "@" (used for the username), then puts in the designed password. If there is no "@" then it puts in a blank space.

How to download the
CSV file

Step 6


The final step was to download the sheet as CSV file (Comma-separated values) on the current sheet.  Then go to the admin page and create "multiple users."  Next upload the CSV file, which will finalize the creation.  It will send you an email when all the users have been properly created, and let you know if there were any errors.

Admin Page for User Upload

Nutshell


In the end, this Google Sheet I created (with the assistance of +Jay Atwood's presentation) helped me to create vast amounts of user accounts in a far shorter amount of time.  Obviously I do not understand all the formulas or how they work or ways I could do even better.  Hopefully this will ultimately help you reduce your work in some form or fashion.  Feel free to add any comments on how this process could be made even easier!  


Here is a link of a copy you can make of my sheet I created:  Example Google Sheet

Thursday, August 6, 2015

Google Educator Certification

Google Educator Certification


Starting around the end of June, Google reorganized their "Google Educator Certification" Program.  Prior to the change, individuals who sought to be "Certified" had to take various tests within a certain amount of time (beginning to end) and it cost around $99.  With the growing demand for teachers to be proficient in using the Google Apps for Education in their classroom, Google simplified the "certification" program for teachers.

Current Design:


The new training/certification program is broken up into various different levels based upon the purpose of the certification.  They are as follows:
Google Educator Level 1 Certification: Proficient
Google Educator Level 2 Certification: Advanced
Google for Education Certified Trainer: Previously known as "Google Educator Certification"
Google for Education Certified Innovator: Brand New

(I'm not sure that you must pass Level 1 Prior to passing Level 2)

Google Educator Level 1 Certification Process


After attending the Google Summit in Kansas City, I developed the urge to become "Google Educator Level 1" certified.  I was surprised at what well designed program Google had developed in order to help individuals become certified.


Level 1 Training Module

Step 1:  Begin taking the Level 1 training module

Option to move from each subunit
After you sign-in on the training module page, you can begin to work through the various different units that Google (with the help of Google Certified Trainers and Innovators) designed to help you better use Google Apps in your classroom.  While it is setup in the traditional unit format (Ex. Unit 1, Unit 2, etc.), you are able to jump around from different units.  Within each unit, there are 3-5 subunits full of tutorial videos, links, articles, etc.  Along the side are links that let you know which subunit you are in, as well as the other options within the Unit of study.


Sidebar
At the end of each subunit in the training module, Google provides a "Lesson Check" that includes topics discussed throughout the subunit content.  This lesson check includes multiple choice, matching, checkbox, etc. with the option to "Check Answer."  Their goal obviously is to help you learn the answer (as these are not scored) not just prove that you do not know the answer.  Then at the end of each unit is a "Unit Review" with various types of questions.  Most of the questions are based upon "Real-Life" Applications, such as: "Teacher A wants to do a interactive lesson on Lewis & Clark's Expedition.  What are a couple tools Teacher A could use to help students better identify the route taken and the problems they faced?"
Lesson Check

Tip:  I would skip all the videos and go straight to the "Lesson Check" and "Unit Review" in order to figure out the topic and lesson of the Unit.  Then I would check my answers.  If I got them wrong, I would go back in the subunit in order to better learn that portion.  If I couldn't find the answer clearly, then I would Google specific tool and what I needed it to do.  Many times it took far less time to do the Lessons than Google estimated it would take.

Then you would check the answers that you felt best applied to the situation.  On the "Lesson Check," it would inform you of when you got it wrong and provide you the correct answer.  


Unit Review
On the "Unit Review" however, it only informs you of the number correct.  Therefore you have to work harder to know which questions you got wrong and why you got them wrong.  Sadly, the one problem I faced on the Unit Review was the Fill-In-The-Blank style question.  It would count it wrong even if you forgot something as simple as an "s" and because it won't tell you which ones are wrong/right (in terms of question) then you can be left frustrated.

Tip:  On the "Select all that apply" or the equivalent, select them all and it will let you know which ones are incorrect.  Also work one question at a time in order to better determine any wrong questions.


Taking the Exam


To take the exam, you will need to register via the following link: Register for Exam

The Level 1 Certification test costs $10 and will be emailed to you within 24 hours of you registering for the test.  The test itself must be taken within 7 days of receiving the email.  Once you receive the exam via email, you will log in with the username and password that they provide.  It will then inform you that you need to have a camera on your computer in order to demonstrate that you are indeed the individual taking the exam from beginning to end (they mention that they take pictures periodically to verify that you are the same person throughout).  You are given a 3 hour window to finish the exam once started.

Tip:  When taking the picture at the beginning of the test, wear a presentable shirt in case they apply it to your certification.

The test itself is split into two Stages.  

Stage 1 is made up of multiple choice, matching type, fill in the blank, etc. (Think traditional test).  In this section of the test, you are allowed to flag each question in order to go back and double check your answer later on if desired.  
This is the badge for passing the exam.  It will be sent
via email after passing the exam.

Stage 2 is a practical uses test.  Basically they create a fake school domain (filled with fake users) with 11 scenarios.  Each scenario has anywhere from 2-7 objectives that must be completed.  These objectives can be anything from creating a document, to sharing it, creating a youtube playlist, etc.

Tip:  Use a 2nd computer to help you work through any of the problems on your certification exam.  Google does not care if you have all the processes memorized.  They just want you to be able to come up with solutions (including using Google Search).

Tip #2:  On the Calendar portion of the test, you are able to see other individuals who have taken the exam prior.  Their events will be displayed (as they are on the same domain obviously).  So if you are not sure if you have done it right, double check with their calendar event.

After finishing the 2 Stages (within the total 3 hour limit), you will receive your pass/fail decision within minutes.  

Level 2 Certification
This is the badge for passing the exam.  It will be sent 
via email after passing the exam.

When/If you decide to do the level 2 certification, you will find that the process is virtually the same as Level 1.  The only difference is that the content of using Google Apps is slightly more difficult (Ex. Using Add-ons, adjusting Youtube videos, etc.).  The only other difference is the format of the test.  It is still a 2 Stage Test, but the number of questions/scenarios is slightly higher:  Stage 1 - 25 Multiple Choice/Matching; Stage 2 - 12 Scenarios with 1-5 objectives per scenario.

Finality


Hopefully this information is helpful at how the process works!


Sunday, August 2, 2015

Google Apps Principal Resources

"Beginning of the Year"

We are one week away from our "Beginning of the Year" meetings and professional development.  As we prepare for this new year, our first as a Google Apps For Education (GAFE) school, I looked back to what I have learned over the last month or so.  I attended the Google Apps Summit in Kansas City and was inspired by +Melinda Miller's presentation on tools for Administrators.  So I scheduled a meeting with the four Principal's in our school district (HS/JH, Athletic Director, Lower Elementary, and Upper Elementary) to demonstrate some of the possibilities of Google Apps.  In preparation for this meeting, I enlisted the help of +Patrick Dempsey (Google Apps Certified and has his Masters in Administration).

"Gobs of Possibilities"

As I looked over all of +Melinda Miller+Patrick Dempsey, and various other resources suggestions, I was amazed at all the free possibilities with Google Apps for Principals (Or teachers for the matter).  I found myself struggling to truly demonstrate all the possibilities and ultimately decided to keep the suggestions brief.  At our school (probably similar to many of yours) our Principals carry many hats/jobs/responsibilities.  While I know they would love to do all these (and more), their available time to work on them is minimal.
Here is the slide I will present to the principals:


"Advise"

Realize that I am simply a teacher and I have never been an administrator.  If you have any other suggestions to provide to the principals at our school district, please feel free to pass those suggestions on to me!

Wednesday, July 22, 2015

Ready, Setup, Slowly

Ready, Setup, Slowly


Map of School District (Made by using mymaps.google.com)

District DESE Information

For those wondering what our school district is like, I have provided both a map and the Missouri Department of Elementary and Secondary Education data.  You will notice pretty quickly that we are indeed a small school district, at least student population wise.  We currently serve roughly 711 students K-12th grade, with 72 certified staff members.

Chromebooks Arrived!


Thanks to students Chase White and Briley King for helping me
get all the Chromebooks to my classroom!
Earlier this week the Chromebooks we order for the school district arrived!  Due to it being summer, I had to scrounge around the school to see if anyone was around to help me move them to my classroom.  Luckily the first session of weight lifting had just ended so I was able to pick up two students, Chase and Briley.  These two gentlemen used their ingenuity and found carts in the Cafeteria that helped us to move a greater number of chromebooks in a shorter time period.

With all the Chromebooks in my room, I began the setup process.  I took one of the power supplies from a box and used it for all the Chromebooks (for efficiency purposes).  Sadly, before I could begin I had to figure out why the outlet in my room did not work.  After getting a hold of our maintenance crew, we realized they had tripped the breaker while cleaning the floors. 
 
After the start-up screen

Setup

Initially I would open one box at a time, and begin the setup process.  I later learned to open a larger number of boxes, and then do the setup process of multiple Chromebooks at one time.

Then I started the Chromebook unboxing, and began setting them up.  These Chromebooks are designed to not turn on (even if opened) until they have been plugged into a power source (thus the one power supply to rule them all).  Once plugged in, it would begin the load-up process.  The first question it asks you is for your network ID and Password. *Side Note: Once the power has been turned on, you can unplug it and finish the process as most Chromebooks battery is at 70+% power.

A few Chromebooks said this when trying to enroll them.
After it accesses the Wifi, it will bring you to the standard sign-in.  Note For Chromebook Management: Do not sign-in without the "enterprise enrollment" screen, otherwise you will have to reset the Chromebook. To access the "Enterprise Enrollment" screen, press CTRL + ALT + E, which should immediately bring you to the enrollment screen.  If for whatever reason it says "opps..." instead of the enrollment screen, simply access as a guest.  Then sign-out of guest and press CTRL + ALT + E again, which should work like a charm now.


My setup for the afternoon.

Suggestion

As I mentioned earlier, I have three different schools that these Chromebooks are being sent to, each with their own "Organization" I created on the Google Apps Admin Dashboard.  So what I did was create a generic user (ex. Deploy@domain) with the administered role of "Services Admin" (which allows enrolling Chromebooks into management).  Then go to Device Management > Chrome Management Sidebar Link > User Settings > Enrollment Controls (Picture down below).  Then have the settings as followed: "Place Chrome device in user organization during manual enrollment," and set it to "Place Chrome device in user ogranization."  Finally, move the generic user to the desired organization of the Chromebook.  

Overview:  What this does is put the Chromebooks into whatever organization you plan on distributing them too.  Keeps you from worrying about locating the correct Serial Numbered Chromebooks in the future (For settings purposes, etc).

Progress

At this point, I am half-way through enrolling all the devices into the management console.  Hopefully I am setting it up properly in order to avoid frustration later down the road.  I'm sure there are even more tricks/tips that I could be using to help expedite this process, but for now all seems to be going well.  If you have any ideas or tips, feel free to comment!

Needed a system to help keep the Chrromebooks
separate by building.
Easy way to keep track of the Power Supply


Start-up Screen
A lot of boxes...
Progress being made but slowly...

Sunday, July 19, 2015

Winds of Change

It Begins...

So as July begins to wind down, the excitement for a new school year starts to build.  At Ash Grove, the new year presents itself with some exciting new developments for our students and staff.  We as a school district are beginning two new adventures:  Google Apps For Education (GAFE) district-wide and the beginning of a 1:1 technology movement.  Before we prepare for this new future, let's reflect on where we have been before.

Abridged History

These new adventures were born out of the work of teachers across the school district over the last couple of years.  About 4 years ago, multiple teachers at both the High School and Elementary level began to desire more access to technology for their classes.  I am a social studies teacher at the High School (teaching Junior level American Government, and various other electives) and I was one of those teachers.  So when I found out that it was my turn for the purchase of new textbooks, I asked my principal if it was possible for me to get a classroom set of technology in-lieu of textbooks.  Luckily for me, the principal was trusting enough to pursue this adventure.

So why did I want technology as opposed to textbooks?  

Simply, I wanted to provide my students with all my resources and the internet seemed the easiest means to do so (especially considering how quickly things can change in the political world I was teaching about).  Also, I wanted to better prepare my students for college, where technology was playing an even greater role.

What kind of technology did we buy and why?

My principal and I constantly discussed the advantages and disadvantages of various different technology options 5 years ago.  By the end of that school year (2011), we had decided that Apple's iPads were the best fit for us due to a couple different reasons:

1.  Their batteries would last an entire day. (We only have two outlets in the room so extension cords for students to plug-in were not an option)
2.  They were a stable platform to work with on a daily basis.

At that time, iPads were the only tool to meet those two criteria.

What resources was I using with the iPads?

Once I got the new iPads into my classroom, I set out to make my class as paperless (and accessible) as possible for my students.  During the summer, before I got my iPads, I was blessed to have an Ash Grove alum (Chris Beeson) who graciously installed Moodle onto our server domain.  Moodle is basically an online tool similar to Blackboard or Angel used by many colleges.  It allows you to do Blogs, provide links, give/grade tests, etc.  With that resource available, I wanted to also provide parent/guardians the opportunity to see the notes/assignments that would be assigned to their children.  Therefore, I setup a Google Site which housed all my notes (which were still Powerpoints) and assignments (which were turned into PDF's). https://sites.google.com/site/coachhoup/
In a nutshell, those are the two resources primarily used in my class that first year with iPads.

A couple other things that were used for note taking purposes were a SmartBoard and an Apple TV.  The SmartBoard is a very valuable tool, but I didn't really use it's full capability.  It's main use was moving my powerpoints forward.  The Apple TV provided me the chance to have students send their iPad screens up to the projector when they had completed activities.

Google Apps for Education Changed the Game

Then two years ago Google Apps for Education began to make headways into the Educational sphere.  I had begun to use tools on my own (Gmail, Google Docs, etc.) for my Masters Classes that I was taking at the time.  Then a good buddy of mine (Patrick Dempsey-Middle School Science Teacher) began to show me the cool uses of Google Apps in his classroom.

With his prodding, I began to see how I could use those tools in my classroom as well.  So we began to take notes and collaborate on research via Google Docs.  It obviously was not a smooth transition because I had to use my personal Gmail Account and encourage students to create their own Gmail Accounts as well.  It was awesome to be able to provide instant feedback to students (as well to no longer have the, "I left it at home" excuse).  This also encouraged the English teachers (one of them being my wife) to use Google Docs as well in their classroom.  Thus began the desire of getting Google Apps at our High School.

At the beginning of this last school year (2014-2015), I was finally able to establish the high school as a Google Apps school.  Even though I had no experience working with the Google Apps Admin, we at the high school pressed on to implement the tool.  Four to Five teachers decided that they were going to use Google Apps extensively.  The tools we all decided to use included:  Blogger, Sheets, Docs, Slides, Sites, and Calendar.  All of us used them to varying degrees, but all of us used them at the basic level (meaning no add-ons, etc.).

(In terms of security as a school district, it was nice to move to a school owned Google Apps domain.  By using it, instead of our own personal Google Accounts, we could provide and maintain archive student/teacher communication/work.)

Winds of Change?


As January of 2015 began to roll around, the school district began discussing a broader use of technology in the district as a whole (not just High School).  The administration developed a technology committee to discuss our goals and action steps to achieve those goals.  Basically we decided to implement Google Apps district-wide and begin moving to a 1:1 initiative.  The Google Apps (at least to those of us who used it in the classroom on a regular basis) seemed like a no-brainer and a great step forward for our school district.

The difficulty we had with the 1:1 was the decision of what technology would be best for the initiative (if any).  So we sent feelers out to multiple schools who had already implemented that initiative in their districts.  We wanted to see the good, the bad, and the ugly of their experiences.  Overwhelmingly, the other districts found great success with their programs, specifically with their Chromebooks.

By now, Chromebooks had become powerful tools for the classroom.  The committee developed their basic goals (similar to my own goals four years prior) for technology:

1.  Their batteries would last an entire day. (We only have two outlets in the room so extension cords for students to plug-in were not an option)
2.  They were a stable platform to work with on a daily basis.
3.  Able to effectively use Google Apps. (The new goal the committee added)

So we ordered a couple of Chromebooks (A Dell 11 and an Acer C740) to test out their capabilities.  Since I had already began using many of the Google Apps programs in my classroom, I would give these Chromebooks to my students to see how they would do during the school day.   Not only did they last through the entire day (with heavy use), but the students overwhelming preferred it over the iPads.  I also gave the Chromebooks to various teachers for them to explore, both personally and in the classroom.

Therefore as a committee, we decided upon getting Acer C740's for the upcoming school year.  While we do not have the funds for complete 1:1, we decided to get a couple classroom sets each year until we achieve the 1:1 numbers.

Preparing the Staff

Since we were going district-wide, we decided that our staff needed some PD on the possibilities of Google Apps in their classrooms.  So the 4 High School teachers who had used Google Apps during the school year organized a district-wide "Google Apps Conference."  It was a little scary but fun experience to demonstrate the capabilities to our fellow staff members.  Realize that none of us were Google Certified at this point, but were willing people.  Certification is not necessary to be a catalyst for your school district.  (I have since passed the Google Educator Level 1 Certification Test)

New School Year (2015-2016)

So this new school year provides us as a district with multiple new/exciting opportunities.  We are providing two classroom sets of Chromebooks to the two elementary schools (four total) and 3 classroom sets for the High School/Junior High.

While the implementation of technology is an exciting new venture, it is bound to have some challenges.  I am looking forward to exploring these challenges, finding solutions, and sharing them with you.