Saturday, April 16, 2016

Twitter - Just A Nudge

Twitter - Just A Nudge

Twitter.com
As the school year rolls along, I thought it was a good time to encourage you to be involved in Twitter.com for professional development purposes.  For those who have never tried it before, feel free to go to https://twitter.com/search-home and start seeing what is available to learn today!  

Some of the basics include:


1.  Twitter handle is your identifying name (similar to email address).  For example, my Twitter handle is @coachhoup24 .  If someone wants to "tweet at me" (again similar to sending a message on email), they just compose a message with "@coachhoup24 ..." and I will receive it.


2.  There is nothing wrong with being a fly on the wall with Twitter and just following people.  Nothing says that you need to ever personally tweet.
3.  Hashtags (#) on Twitter can be used in one of two ways.  First to demonstrate your nonverbal communication.  For example, a tweet could say, "Today's lesson plan involved puppets and singing! #TheKidsLovedIt #ProudTeacher"
4.  Tweets can use no more than 140 characters, including anyone that you mentioned.
5.  If you don't like what people are tweeting, then simply unfollow them (They will never know!). 

Join Us!


If you are considering joining Twitter, here is a resource to help guide you in developing a professional Twitter account:  New 2 Twitter Resource .  This resource provides ideas on how to set your own account up as a educator and what to do once you are active.  When we as a district did a survey a couple months ago, some teachers already involved with Twitter provided some of their "top people to follow."  
They suggested:

This is obviously not an exhaustive list, but none-the-less a good place to start.

The final benefit one gets from Twitter is the opportunity to participate in events called, "Hashtag Chats."  One great one to follow is #MoEdChat, which takes place every Thursday at 9 PM CST.  It's a great event to just jump on and see what other educators throughout Missouri doing.  One final chat that is great to follow is #GAFESummit, which is used by +EdTechTeam for their Google Summits held throughout the world.  It is a "slow chat," meaning it is happening throughout the day, and most active when they have summits on various weekends.  

Other Resources:

Tuesday, February 23, 2016

Google Forms Do More Than Just Surveys (S. Gadient)

Google Forms Do More Than Just Surveys

By: Sharon Gadient - AGHS Math Teacher


Intro

It’s that time of year again -- the “third quarter slump”: that time when I am desperately searching for some way to gain and hold my students’ attention long enough to stuff some knowledge in their heads. Switching up instruction is one of my tried-and-true strategies, and since I just got a working set of iPads in my classroom a few weeks ago, I was looking for a free tech tool I could use to get more interaction from my Algebra 2 students, allow for “think time” and help students self-assess. After playing with Socrative and Nearpod, I found it in a surprising place when I turned to a couple of features in Google Forms that give students real-time feedback on their guided practice problems.


What kinds of interaction does forms allow?

There are two tools that we can use for this depending on the type of question:


  1. “Go to Page Based on Answer” is an option in Multiple Choice questions that gives students different feedback depending on the answer they select, and can redirect them to try again.


  1. “Data Validation” is an option in Text responses that tells students immediately if they are wrong, will not let them proceed until they get it right, and can give students hints.


Click the link below to see a silly example quiz that demos some of the interactive things you can do with forms.


Make your own

In the video below, I walk through the process of creating interactive questions in forms.


For a text version of the directions, go to this link:


How I use it

I create a few “Guided Practice” problems that students complete as we talk through our note-taking guide, and I sometimes add in some or all of their homework assignments to be completed in forms. Students get feedback on the guided practice, right/wrong feedback on the first couple of homework problems, then they are on their own and I can have forms grade their responses automatically with the Flubaroo add-on. I also leave these forms posted in Google Classroom after the lesson for students to access any time for review.


I have found that Students are more engaged and ask more questions during the lesson than they did without using the forms. This is especially popular with my weaker math students who gain more think time and build confidence with the guided practice.

As always, playing with it gives you a better feel for the process, so tinker away -- I’m sure you’ll discover things I never thought to try.


Bio:


Sharon Gadient is a Math Teacher at Ash Grove High School. This is her eighth year of teaching mathematics, and she still loves it. Sharon enjoys applied mathematics, and has a special fascination with fractals (both the pretty and the useful). Her hobbies include playing with technology, writing, and curling up on the couch with her German Shepherd to watch Dr. Who.

Twitter Account: @library_ghost

Thursday, February 18, 2016

Spice It Up With EdPuzzle! (B.Watts)

https://edpuzzle.com/
This is a blog post written by one of the students at Ash Grove High School.  

Spice It Up With EdPuzzle!


Are you tired of boring presentations? Do you need a way to ‘spice up’ the classroom to engage your students? If you’re ready for an overhaul of awesome, prepare for the incorporation of EdPuzzle, the latest and greatest in class video presentation technology. (Think Billy Mays here)

With EdPuzzle, making an interactive video for students is simple! For easy presentation and conciseness (and less work on my end), I have developed a very easy-to-follow, step-by-step guide!


Step numero uno:

Get that ‘thang’! Get to their website here or get the Chrome app here (this will make a link on your Google Chrome, which will just take you to the website.)


Step 2:

Create a free account.

Did I mention it was FREE? Oh yeah, I did.
(Google App teachers, feel free to use that account to seamlessly connect to your classroom. “Seamlessly”, or at least those overlapping seam-things that don’t make that awkward bump on the shoulder of your shirt. We’ve all been there.)

Step Tres:

Make your first video! Either upload a video from YouTube or anywhere else (Khan Academy, Learn Zillion, and more), or your own video. I’m sure you won’t encounter any copyright law infringements.


Step 4:

After uploading, you can crop the video, add voice over commentation, and even add quiz questions that pop up throughout the video. It’s like an interactive YouTube for schools.


Step Cinco:

Share or “assign” the video to your class on EdPuzzle, or your Google Classroom class, if you used your Apps account.

See? It’s as simple as that. Now you must take action. Go, take what I have given you, and teach those kids. Let us know how it goes and any other suggestions you might have for using EdPuzzle!


  • Post videos or use from YouTube, Khan Academy, Learn Zillion, and more
  • Crop video, add comments, insert voice-overs, and create a quiz for video
  • See data of student quizzes taken
  • Engaging, Effective, and FREE


Brandon Watts Bio: 

 Brandon Watts is a Senior at Ash Grove High School. He is excited to continue his education in 
human health and science at Missouri State University (Fall of 2016). He enjoys doing everything, whether it’s swimming, biking, running, all three of those combined, futbol-ing, hiking and enjoying the day, or even reading a good book on differential calculus or exercise physiology. Brandon is a lifeguard, lifeguard instructor, and pool supervisor, meaning he has some level of responsibility. Having fun is his main concern, and he is ready to take on life!

Saturday, January 9, 2016

Lucidcharts To The Rescue!

Web Diagram

In my American Government class, we began the discussion of the legislative branch.  One of the important aspects of this branch is the process of how a bill becomes a law.  This semester I decided that we would do it with a tech tool, which could allow for collaboration, correction, etc.  
Initially, I had students use "Mindmaps by mindmapmaker.org" to diagram how a bill becomes a law.  After the first day of students working with this tool, it became apparent that it was a frustrating tool for the students.  (Mindmaps may be a wonderful tool, but for what I was asking my students to do, it was not helpful.)

Doesn't Work... Fix it

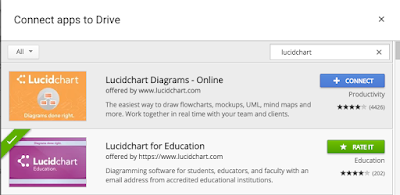
As I saw the frustration on my students' facez, I decided it was time to find a new tool.  So I went back to drive and looked for another web diagraming tool.  That's when I found "Lucidcharts for Education," and immediately I knew it was going to be a better tool for our project.  It allowed students to make any adjustments seamlessly, while also saving instantly (which mindmap failed to do).  

Lucidcharts

Initially when you sign up for Lucidcharts, it places you in the "free-version" which has various restrictions such as:  create only 5 documents and the use of 60 "complexities" (or as I told my students "symbols").  For the project we were doing, the "complexities" limitation was frustrating, but as a program, the students absolutely loved it!  It allowed for quick adjustments, additions, and reformatting that was excruciatingly tough to do on Mindmaps.

How to use Lucidcharts

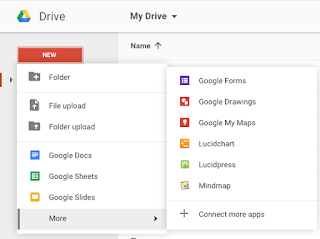
To create a web diagram using Lucidcharts, just go to your Drive and click the following: New-->More-->Lucidcharts.  Then create a document (either blank or from one of their templates) in order to get started.  From there, you can drag various symbols over from the left toolbar such as Text, Shapes, etc.  With the boxes or text on the document, you can draw lines to help create a flow from one step to the next.  (After Lucidchart approved our school for the free education upgrade, you will have unlimited complexities!  That definitely made all the difference).  To help make the web diagram stand out, students can change the fill color of the boxes, lines, text, etc.  

For our project, I suggested to students that they color code the steps to help them quickly identify things like vocabulary or the house/senate differences.  Finally, students can share their projects with each other as a point of reference.  It was interesting how different students found steps/information that other students had missed, so sharing it with each other helped them to add them to their own project.  Also, (unlike Mindmaps) Lucidcharts allows individuals to work simultaneously with one another (just like the other Google Apps Tools). 


Google Classroom - Turn It In


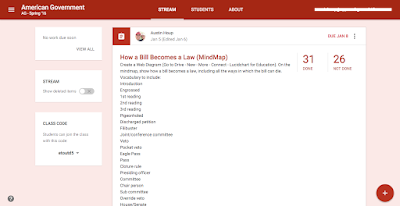
I provided the assignment through Google Classroom with the expectations.  As students found valuable resources, they would share them via the "class comment" so that other students could use them.  When students finished, they would add it to Google Classroom the same way they would turn in other Google Apps products (docs, sheets, slides, etc.).  


Student Examples


Suggestions

Any other suggestions for fellow teachers to use this (or similar) tools in their classroom?  Give us your thoughts!

Wednesday, September 30, 2015

MyMaps: Student Created Maps!

Earlier in the school year I introduced the idea of using Google MyMaps in the classroom.  Over the last week couple of weeks, I began using it in a couple of my classes.  The result of the students using MyMaps was stunning.  While these maps are imperfect (missing details periodically due to student error), they demonstrate so many possibilities for student creation.

European History - European Explorers (Freshmen through Seniors)

European History - Absolutism Research (Seniors)

World Geography - Distribution of Natural Resources (Sophomores)


World Geography - North American Research (Sophomores)

Lesson Plan Design


First, determine what your goal/objective is for the lesson.


For both World Geography and European History, it was an easy and natural fit to use MyMaps.  In European History, I have always had students do some type of presentation (Powerpoint, Keynote, Slides) to detail the trips and explorations of various explorers.  But as I prepared for that annual lesson, I decided to give MyMaps a go around in order to have a completely student created product.
For World Geography, I have always wanted them to get a greater understand of the world's natural resources and the disparity of their use/production throughout the world.

Tip: Create a generic map for students to look at, in order to understand how they can manipulate their own maps.

Second, provide the guiding questions and objectives for students to quickly access and research. 


New this year, I have been using Google Classroom for my classes.  To get students the questions and topics, I posted an "assignment" on Google Classroom with the following:
Topics/Questions
Types of resources to use
How to cite sources
Link to MyMap (Created by me, but will explain how later)
Initial Due Date (To help critique student work)

Tip:  When creating the MyMap link as a teacher, go to mymaps.google.com.  Then click share and change access to "Anyone at *School Domain* with the link" and "Can Edit."  Next, copy the URL and post it on the Classroom Assignment.
Front Page of
mymaps.google.com 


Third, students begin researching and posting their information to the linked MyMap.


I had each student (or in my case pairs) create a "layer" on their MyMap for a couple different reasons.  First, I wanted to be able to easily assess the students without having to search throughout the map for each students work.  Second, it prevented students from accidentally deleting or changing other students work.

Tip:  There is a limit to the number of layers (10 Total) you can create, so be cognizant of the amount.


Fourth, review students work and provide immediate feedback on their design and information.


Example of Student work
As students begin posting their information to the map, give them insight on how best to improve their layer.  For example, having students use different colors/symbols in order to differentiate their work from other students (Ex. Christopher Columbus being the yellow line and markers).  Some other ways to improve their map would be to include the following:  Pictures/videos on markers, journal writings or data information for each marker, proper structure/organization on the side information bar.

Tip:  Unlike the other Google Apps tools, Google MyMaps does not automatically update as students work on it.  However, if you reload the map, all the other work will be updated to your map.


Fifth, share the student work with the rest of the world!


After students have completed the assignment, change the share settings to "On - Public Web" and "Can View."  Then copy the URL and share it out to the rest of the world!

Tip: Post it to Google+ in order to demonstrate your students work, as well as inspire other teachers to have students create their own resources!

What other ideas do you have for student created maps?  Ways to make the process even better?

A video below to explain how I use this in the classroom!


Sunday, August 30, 2015

Google Educator Presentation

This Friday I get the joy of presenting to various teachers within our Conference.  My presentation will be focused on the Google Educator Certification Process and everything needed to do well on the exam.  I have included the Presentation on this Blog, so give me any other suggestions you have concerning the exam and it's process!

Thanks to various individuals who helped me along the way: 
+Patrick Dempsey 
+Alice Keeler 
+Jay Atwood 
+Kyle Pace 


Sunday, August 16, 2015

Google My Maps - Student Created Maps

Maps

As a high school social studies teacher, I constantly use different types of maps for all of my classes.  More times than not, these are maps created by other individuals with various amounts of information that may/or may not be pertinent to my classroom.  

After attending the GAFE (Google Apps For Education) KC Summit this summer, the idea of map creation (as opposed to map consumption) became a real reality.  The presentation was done by Stafford Marquardt (Product Manager for Google My Maps) on how to use mymaps.google.com to create interactive maps.  Simply put, this presentation rocked my world in all the right ways!

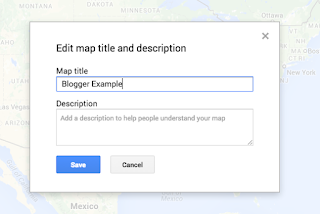
Title the Map

So how does it work?


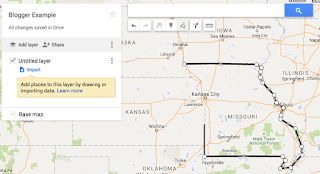
Outline an area
First go to mymaps.google.com and start creating maps!  One of the cool features of My Maps is that the file is automatically saved in your Drive so that you can access it like your other Google Docs.  Which means you can also share them just like Google Docs, Sheets, Slides, etc.  I realize that right now I need to provide more details on what to do, but really just messing with My Maps will amaze you. 


Tips/Tricks

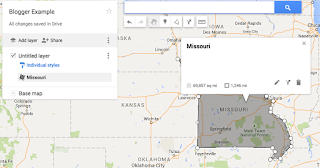
Title the shape
Create various different "layers" in order to keep it nice, neat and organized.  If you want students to work on the same project, then have a different layer for each student.  

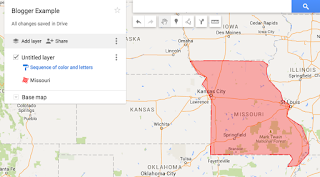
Use the drawing mechanism to outline states, cities, etc. and then apply a color over the top.  Once the color is applied, you can change the transparency to the desired level.
Provide a color to the shape

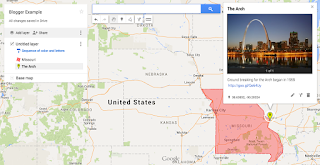
When you use the "marker" option, you can include pictures, videos, descriptions of that marker or location.

Insert a marker with various Details
If you do not want to create maps, or have students create maps, Google has provided some pre-built maps.  These maps can be found at both of the following:

MyMaps Gallery

Google Maps Gallery

I have created a short Youtube video (60 seconds) that demonstrates how to download one of the template maps as a KMZ file and then import it into My Maps:

Also provided is the Presentation done by Marquardt that explains and provides examples of other ideas using My Maps:

MyMaps Presentation

Classroom Example:  

Have students draw the path of Lewis and Clark from St. Louis to the Pacific and back.  Break up the students with the job of a specific city on the route to another city (St. Louis to Omaha).  Then have students trace the path, provide images of those location (Past and Present), and include words/images from the Lewis and Clark Journal (Link to Journal) to the spot where it was likely written.

Conclusion


I want to end with the following statement I have used constantly in the last two months. Start by messing with it and do not be afraid to break it.  It normally is easy to fix and you will be shocked how capable you are at creating cool/interactive things!