Showing posts with label Classroom. Show all posts

Saturday, January 9, 2016

Lucidcharts To The Rescue!

Web Diagram

In my American Government class, we began the discussion of the legislative branch.  One of the important aspects of this branch is the process of how a bill becomes a law.  This semester I decided that we would do it with a tech tool, which could allow for collaboration, correction, etc.  
Initially, I had students use "Mindmaps by mindmapmaker.org" to diagram how a bill becomes a law.  After the first day of students working with this tool, it became apparent that it was a frustrating tool for the students.  (Mindmaps may be a wonderful tool, but for what I was asking my students to do, it was not helpful.)

Doesn't Work... Fix it

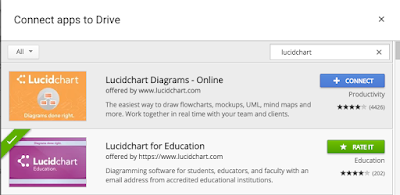
As I saw the frustration on my students' facez, I decided it was time to find a new tool.  So I went back to drive and looked for another web diagraming tool.  That's when I found "Lucidcharts for Education," and immediately I knew it was going to be a better tool for our project.  It allowed students to make any adjustments seamlessly, while also saving instantly (which mindmap failed to do).  

Lucidcharts
Initially when you sign up for Lucidcharts, it places you in the "free-version" which has various restrictions such as:  create only 5 documents and the use of 60 "complexities" (or as I told my students "symbols").  For the project we were doing, the "complexities" limitation was frustrating, but as a program, the students absolutely loved it!  It allowed for quick adjustments, additions, and reformatting that was excruciatingly tough to do on Mindmaps.

How to use Lucidcharts

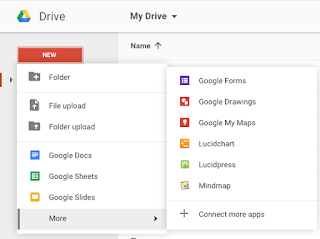
To create a web diagram using Lucidcharts, just go to your Drive and click the following: New-->More-->Lucidcharts.  Then create a document (either blank or from one of their templates) in order to get started.  From there, you can drag various symbols over from the left toolbar such as Text, Shapes, etc.  With the boxes or text on the document, you can draw lines to help create a flow from one step to the next.  (After Lucidchart approved our school for the free education upgrade, you will have unlimited complexities!  That definitely made all the difference).  To help make the web diagram stand out, students can change the fill color of the boxes, lines, text, etc.  

For our project, I suggested to students that they color code the steps to help them quickly identify things like vocabulary or the house/senate differences.  Finally, students can share their projects with each other as a point of reference.  It was interesting how different students found steps/information that other students had missed, so sharing it with each other helped them to add them to their own project.  Also, (unlike Mindmaps) Lucidcharts allows individuals to work simultaneously with one another (just like the other Google Apps Tools). 


Google Classroom - Turn It In
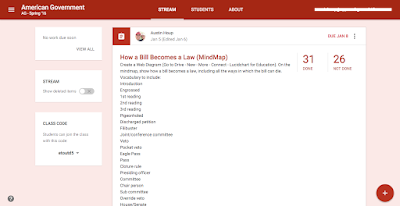


I provided the assignment through Google Classroom with the expectations.  As students found valuable resources, they would share them via the "class comment" so that other students could use them.  When students finished, they would add it to Google Classroom the same way they would turn in other Google Apps products (docs, sheets, slides, etc.).  


Student Examples


Suggestions

Any other suggestions for fellow teachers to use this (or similar) tools in their classroom?  Give us your thoughts!

Wednesday, September 30, 2015

MyMaps: Student Created Maps!

Earlier in the school year I introduced the idea of using Google MyMaps in the classroom.  Over the last week couple of weeks, I began using it in a couple of my classes.  The result of the students using MyMaps was stunning.  While these maps are imperfect (missing details periodically due to student error), they demonstrate so many possibilities for student creation.

European History - European Explorers (Freshmen through Seniors)

European History - Absolutism Research (Seniors)

World Geography - Distribution of Natural Resources (Sophomores)


World Geography - North American Research (Sophomores)

Lesson Plan Design


First, determine what your goal/objective is for the lesson.


For both World Geography and European History, it was an easy and natural fit to use MyMaps.  In European History, I have always had students do some type of presentation (Powerpoint, Keynote, Slides) to detail the trips and explorations of various explorers.  But as I prepared for that annual lesson, I decided to give MyMaps a go around in order to have a completely student created product.
For World Geography, I have always wanted them to get a greater understand of the world's natural resources and the disparity of their use/production throughout the world.

Tip: Create a generic map for students to look at, in order to understand how they can manipulate their own maps.

Second, provide the guiding questions and objectives for students to quickly access and research. 


New this year, I have been using Google Classroom for my classes.  To get students the questions and topics, I posted an "assignment" on Google Classroom with the following:
Topics/Questions
Types of resources to use
How to cite sources
Link to MyMap (Created by me, but will explain how later)
Initial Due Date (To help critique student work)

Tip:  When creating the MyMap link as a teacher, go to mymaps.google.com.  Then click share and change access to "Anyone at *School Domain* with the link" and "Can Edit."  Next, copy the URL and post it on the Classroom Assignment.
Front Page of
mymaps.google.com 


Third, students begin researching and posting their information to the linked MyMap.


I had each student (or in my case pairs) create a "layer" on their MyMap for a couple different reasons.  First, I wanted to be able to easily assess the students without having to search throughout the map for each students work.  Second, it prevented students from accidentally deleting or changing other students work.

Tip:  There is a limit to the number of layers (10 Total) you can create, so be cognizant of the amount.


Fourth, review students work and provide immediate feedback on their design and information.


Example of Student work
As students begin posting their information to the map, give them insight on how best to improve their layer.  For example, having students use different colors/symbols in order to differentiate their work from other students (Ex. Christopher Columbus being the yellow line and markers).  Some other ways to improve their map would be to include the following:  Pictures/videos on markers, journal writings or data information for each marker, proper structure/organization on the side information bar.

Tip:  Unlike the other Google Apps tools, Google MyMaps does not automatically update as students work on it.  However, if you reload the map, all the other work will be updated to your map.


Fifth, share the student work with the rest of the world!


After students have completed the assignment, change the share settings to "On - Public Web" and "Can View."  Then copy the URL and share it out to the rest of the world!

Tip: Post it to Google+ in order to demonstrate your students work, as well as inspire other teachers to have students create their own resources!

What other ideas do you have for student created maps?  Ways to make the process even better?

A video below to explain how I use this in the classroom!


Sunday, August 30, 2015

Google Educator Presentation

This Friday I get the joy of presenting to various teachers within our Conference.  My presentation will be focused on the Google Educator Certification Process and everything needed to do well on the exam.  I have included the Presentation on this Blog, so give me any other suggestions you have concerning the exam and it's process!

Thanks to various individuals who helped me along the way: 
+Patrick Dempsey 
+Alice Keeler 
+Jay Atwood 
+Kyle Pace 


Sunday, August 16, 2015

1st Day Activity

Welcome Back!


Today we began the new school year!  This year brings with it a lot of new and exciting opportunities for our students.  One of those opportunities includes the influx of chromebooks in a few classrooms.  I was blessed with these new devices after working with iPads for the last 4 years.
Thought-Provoking Idea

New Ideas


As I began to prepare for this first day, I was challenged by a tweet from +Alice Keeler.  Her tweet challenged the following idea: 'Who says we need to go over the syllabus the way we have for the last 50 years?  Who says that we need to "talk" over everything the first day?'

With this thought provoking idea, I developed a new idea.  Why not have students create something that was shared out to the world that describes the syllabus, the class, and them personally?  After talking to my principal, +Chris Thompson, and a fellow teacher (My wife), +Amanda Houp, I created an assignment on Google Drawing for the first day.  (Copy of assignment Link)

My Example

Procedure


As students came into my class, I had them grab a chromebook and log into their School Issued Google Apps Account.  Of course a few students had forgotten their passwords, but with me being the Google Apps Administrator it was easy to change their passwords.  Then I directed the students to the Google Classroom site in order to enroll in my "class" (classroom.google.com).  To do this, I displayed the enrollment code on the TV.  Some students logged on, others struggled.  To help alleviate this and get students on the same page, I had the logged in students (experts) help those struggling.  This helped everyone get on the same page much sooner.  Also, I created a basic example that I would turn in if I were a student which gave visual learners an idea of how to approach the assignment.  (Copy of Example)
Google Drawing Template (Copy)

Details of Assignment


Google+: Student Work Shared
At this point in the class period, students began to work on the Google Drawing by "making a copy."  I would use this time period to periodically teach students different tips/tricks with the Chromebook/Google Apps Account.  Overall, students gained the following skills:  Location of my website (full of resources); Use Google Apps/Drive/Drawing; Find Images/Text; definition between public domain; A few details of my class syllabus; Class Direction/Content; etc.

Tips/Tricks:

Here are a few of the shortcuts I learned and passed on to my students:
Image Attributed to Alice Keeler
Link

Ctrl+L= Highlight URL

Ctrl+C= Copy

Ctrl+V= Paste


On a chromebook, use three fingers on the trackpad to switch quickly between various open tabs within Chrome.

Final Reflection


Are there other ways to do this?  Absolutely!  But overall I was very happy with the amount of preliminary skills students developed.  If you have other ideas or tips, please share for others to learn!


Google Classroom Assignment

 Resources:


My website for all my classes:  Coach Houp's Website
Alice Keeler's Website:  Teacher Tech